
How to Configure Remotely Triggered Black-Hole Routing with Kentik Detect


Summary
Destination-based Remotely Triggered Black-Hole routing (RTBH) is an incredibly effective and very cost-effective method of protecting your network during a DDoS attack. And with Kentik’s advanced Alerting system, automated RTBH is also relatively simple to configure. In this post, Kentik Customer Success Engineer Dan Rohan guides us through the process step by step.
A Fast, Cost-effective Route to Automated Network Protection

Remotely Triggered Black-Hole routing (RTBH) is an extremely powerful technique that network operators can use to protect their network infrastructure and their customers against Distributed Denial of Service (DDoS) attacks. By automating the redirection of undesirable traffic at discrete points in a network, RTBH gives operators the ability to mitigate DDoS and to enforce blacklist/bogon routing policy from a centralized station.
While there are a variety of methods to implement RTBH, including RFC 5634 and source-based RTBH, most network engineers consider destination-based RTBH to be their best first-line defense against DDoS attacks. In a traditional, non-automated RTBH setup, a customer might call and say, “Help! I think I’m under attack.” An operator would then log into a route server and configure the mitigation, which is a /32 host “black hole” route. The route is then redistributed via BGP — along with a ‘no-export’ community and a next-hop address — to the routers where the attack traffic is entering the network. These routers then route the traffic to a destination that doesn’t exist (the black hole), for example a null interface.
Destination-based RTBH is not only incredibly effective at protecting network infrastructure, it’s also inexpensive and can be simple to implement, particularly with Kentik, which makes it exceptionally easy and flexible to automate. You create policies that define any number of conditions that will trigger an alarm, and define as well as how the system should respond to an alarm depending on the specific situation. That response may be immediate, delayed, or manual, it may include notification and/or mitigation, and it may involve just a /32 host route or include an aggregate /24.
We’ve seen gung-ho customers who are using Kentik as a detection and trigger mechanism configure effective destination-based RTBH policies in as little as 30 minutes. The basic steps outlined below explain how you can take advantage of Kentik’s power and flexibility to implement RTBH protection on your network.
Develop a plan for RTBH DDoS mitigation
RTBH can be as simple or as complex as you want to make it. Here are the bare essentials that you’ll want to figure out ahead of actually configuring anything:
- Which routers will you implement your policies on? To enable RTBH within Kentik you’ll need to filter traffic at key points within your infrastructure. You’ll likely want to set up RTBH policies for routers that have direct connections to your transit providers or peers, because you won’t want to carry illegitimate or attack traffic any further than necessary on your network. To use RTBH, those routers must support BGP and provide some minimal implementation of routing policy.
- What will your routers do with black-holed traffic? You’ve got a number of options as to what specifically the black hole will be in your configuration. If you need ideas on how you might set up the black hole in your policies, see this awesome presentation by Joe Soricelli and Wayne Gustavus from NANOG 32.
- How long will you keep a RTBH policy active? Kentik can automate the triggering of RTBH mitigations based upon policies, so it’s up to the user to determine how long such policies should remain in force. Do you want a policy to remain in place until it’s manually removed, or would you like it to deactivate as soon as the attack subsides? Or maybe 20 minutes afterwards, or 30 minutes, or…?
Enable alerting
Most operators find that the real joy of Kentik is its endless flexibility. Chances are excellent that Kentik can be configured to reliably alarm on a given condition no matter how complex a signature or baseline is involved. Luckily for us, the conditions that indicate that a DDoS attack is underway are extremely well understood, and Kentik offers a robust library of alert policies to help our customers quickly protect themselves against DDoS events, from the most common to the most corner-case.
To take advantage of Kentik’s alert presets, choose Alerting from the alerts menu on the main navbar, then click the Kentik alert Library tab. Find an alert whose description matches your needs, then click the Duplicate icon in the Action column, which copies the preset to the list of policies on the Alert Policies tab. Click the policy name to open the Alert Policy Settings page, where you can spend a little time getting more familiar with the policy and tuning it to your specific needs (the payoff is well worth it).
This page is also where you can build a policy from scratch (access via the Create Alert Policy button on the Alert Policies tab), a process that is probably wisest to initially attempt with a Kentik sales engineer or customer success engineer. Either way, when you want to enable your new policy you’ll click the enabled/disabled icon in the right-most column of the policy list (the icon will switch to green when the policy is enabled).
Configure RTBH
Here’s where things get technical, but nothing too crazy. You’ll create a mitigation platform and method, link the two together, then associate them with an alert. To understand how configuration of the mitigation method differs from configuration of the mitigation platform, consider a scenario where RTBH policies are differentiated based on transit providers, interface capacities, or available peers. By creating multiple methods, operators can achieve all the flexibility they need to match nearly any RTBH deployment scenario.
Here’s an outline of the process:
- Identify your routers: In the Kentik portal, go to Admin » Devices. From this pane, make a note of the device ID of the routers that you decided above to implement your policies on.


- Create a mitigation platform:
- Go to Alerts » Alerting, and then to the Mitigation tab.
- In the resulting modal, give your platform a good name and description, then enter the device IDs of the routers you selected in the previous step (comma-delimited list).
- Click the Submit button to close the modal. - Create a mitigation method:
- Back on the mitigation tab, click the Create a Mitigation Method button.
- In the resulting modal, give your method a name and description, then be sure to set up a notification channel so that you can be aware when your policy triggers an alarm.
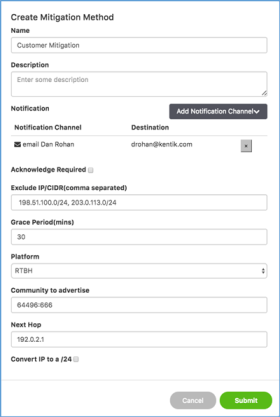
- Next, select the grace period that Kentik should honor prior to withdrawing the blackhole route. Many operators are happy with the 30-minute default because it provides enough cushion to discourage repeat attacks while not being excessively punitive to the IP that was the attack destination. - Select RTBH as the platform:
- Still in the modal, choose RTBH from the drop-down Platform menu.
- In the resulting fields, provide a meaningful community string and next hop address. This is where having your plan and policy that we mentioned earlier comes into play (you did read that awesome NANOG document we referenced, didn’t you?).
- Lastly, if you’re going to do anything fancy like withdraw blocks from certain routers and re-advertise in other locations, you may want to select the ‘Convert IP to a /24’ checkbox. Otherwise, leave it unselected.
- When you’re finished, click Submit to close the modal. - Link the mitigation method to a platform: After you’ve completed the mitigation method, you’ll need to link it to your mitigation platform. On the Mitigation tab, locate the platform that you just created and choose your new mitigation method from the drop-down Link Mitigation Method menu.
- Link mitigation platform and methods to alerts: Almost done. Next, we’ll configure the specific alerts that you enabled earlier to trigger the mitigation platform and method(s) just configured:
- Go to Alerting » Alert Policies.
- Open a policy that you’d like to link to an RTBH mitigation, scroll down to the Thresholds section, and go to the Threshold (Critical, Major, etc.) that you’d like to trigger on.
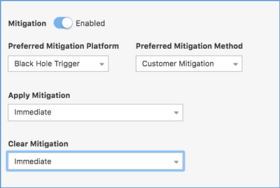
- Then choose your mitigation platform and method from the drop-down menus.
- Next, you’ll need to decide if you’d like to have the mitigation take effect immediately when Kentik raises the alarm, after a user manually acknowledges the alarm, or after a timer expires where no user has acknowledged the alarm.
- Finally, select how fast Kentik should clear the mitigation.
- Click the Save button (right top or bottom).


So there you have it: You’ve just created an alert policy that is configured to trigger RTBH mitigation!
If you’d like help with RTBH setup, please reach out to us at support@kentik.com.
Learn more about Kentik’s solutions for DDoS detection and DDoS mitigation:
- Kentik DDoS Detection and DDoS Mitigation
- Kentik Case Studies about DDoS protection: Square Enix Network Observability and DDoS Protection Case Study, Immedion DDoS Protection Case Study, PenTeleData DDoS Protection Case Study


